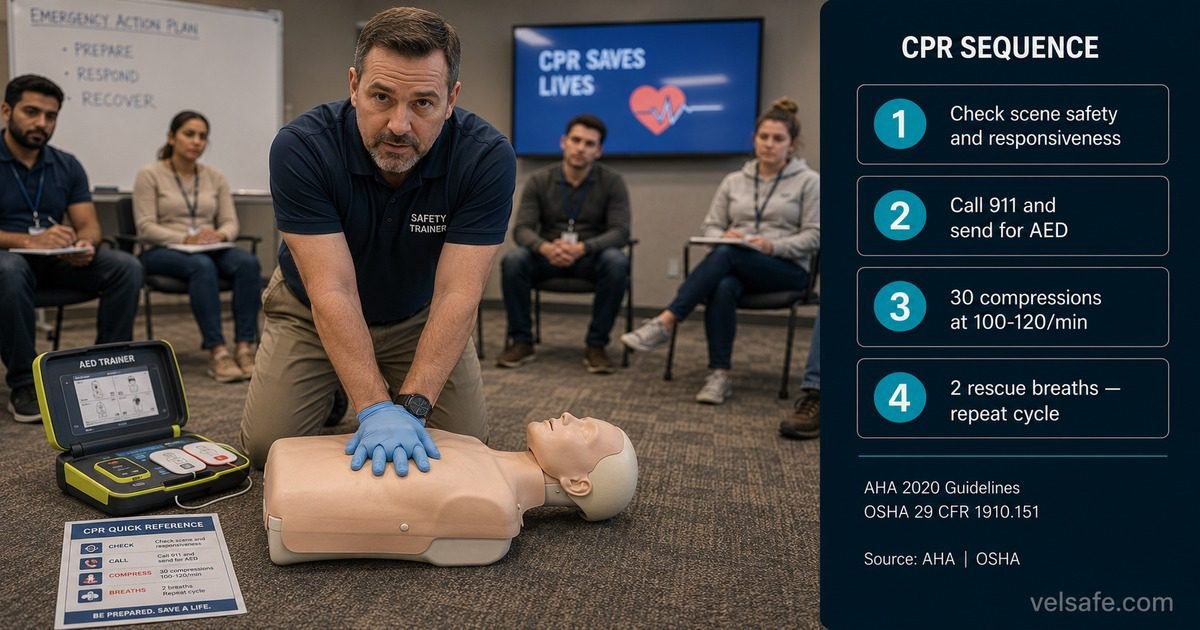
GUIDE: CPR and Emergency Response
How to Perform CPR Safely: A Step-by-Step Guide with U.S. Legal Protections
Cardiac arrest kills more than 350,000 Americans outside hospitals each year. Immediate CPR can double or triple the chance of survival. This guide covers how to perform CPR on adults, children, and infants using current American Heart Association guidelines, how to use an AED, what legal protections apply when you act as a bystander, and what OSHA requires of employers for workplace emergency response.
Quick Overview
What This Guide Covers
Recognising cardiac arrest, calling for help, adult CPR, child CPR, infant CPR, hands-only CPR, AED operation, Good Samaritan legal protections in all 50 states, and OSHA workplace first aid requirements.
Who This Is For
Any person who may encounter a cardiac emergency: workplace safety managers, first responders, employees in OSHA-regulated environments, and any adult who wants to know what to do if someone collapses near them.
Guidelines Source
American Heart Association 2020 CPR and ECC Guidelines (updated 2023). OSHA 29 CFR 1910.151 Medical Services and First Aid. Good Samaritan laws are state-specific; this guide covers the general framework and key variations.
Important Note
This guide is educational. It does not replace formal CPR and first aid training. AHA and Red Cross certification courses provide hands-on practice that this guide cannot replicate. We strongly recommend completing a certified training course in addition to reading this guide.
What You Will Learn
How to recognise cardiac arrest and activate emergency services correctly
Adult CPR technique: compression rate, depth, hand position, and rescue breaths
How child and infant CPR differs from adult technique and why it matters
Hands-only CPR: when it is appropriate and how to do it correctly
How to operate an AED safely and when to use it
What Good Samaritan laws protect and where their limits are
OSHA requirements for workplace first aid programs
Common CPR errors and how to avoid them under pressure
Prerequisites
No medical training required to act
Any bystander can and should perform CPR on a person in cardiac arrest. You do not need to be a medical professional. Good Samaritan laws in every US state provide legal protection for bystanders who act in good faith. The risk of legal liability from attempting CPR is extremely low. The risk of not acting when someone is in cardiac arrest is death.
Scene safety assessment
Before approaching a collapsed person, confirm the scene is safe. Look for traffic, fire, downed electrical lines, hazardous materials, or other dangers that could injure you. If the scene is not safe, do not enter. Call 911 from a safe distance and report what you see. A second victim does not help the first.
Personal protective equipment
Use disposable gloves if available before touching the victim. If performing rescue breaths, a CPR face shield or pocket mask significantly reduces disease transmission risk. In a workplace setting, a CPR barrier device should be part of the first aid kit. If no PPE is available and the victim is a stranger, hands-only CPR is an acceptable alternative.
Required Equipment
Item
Purpose
Required?
Mobile phone or any phone
Call 911 and keep the line open for dispatcher guidance
Essential
Disposable gloves
Barrier protection during contact with the victim
Strongly recommended
CPR face shield or pocket mask
Reduces disease transmission risk during rescue breaths
Recommended; not required
Automated External Defibrillator (AED)
Delivers electrical shock to restore normal heart rhythm; locate nearest unit while CPR is in progress
Use as soon as available
Step-by-Step Instructions
1
Recognise Cardiac Arrest and Call for Help
What to Look For
Tap the person firmly on the shoulder and shout “Are you okay?” If there is no response, look for normal breathing. Occasional gasping (agonal breathing) is not normal breathing. It is a sign of cardiac arrest. If the person is unresponsive and not breathing normally, cardiac arrest should be assumed and CPR should begin.
Call 911 Immediately
Call 911 or have someone else call while you begin CPR. If you are alone, call 911 first, put the phone on speaker, and begin compressions. The dispatcher can guide you through the steps in real time. Do not leave the person to find a phone if you already have one.
Send Someone for an AED
If others are present, point to a specific person and say “You, call 911” and point to another and say “You, find the AED.” Specific instructions to named or pointed individuals are more reliable than general calls for help. Begin CPR immediately; do not wait for the AED to arrive.
Expected Outcome
911 is called, an AED is being retrieved, and you are positioned to begin compressions within 60 seconds of recognising cardiac arrest.
2
Perform Adult CPR (Age 8 and Older)
Compression Technique
Place the heel of your dominant hand on the centre of the chest, on the lower half of the breastbone. Place your other hand on top and interlace your fingers, keeping fingers lifted off the chest. Keep your arms straight and position your shoulders directly over your hands. Push down at least 2 inches (5 centimetres) but no more than 2.4 inches. Allow the chest to fully recoil between compressions without removing your hands from the chest.
Rate and Ratio
Compress at a rate of 100 to 120 compressions per minute. The beat of the song “Stayin’ Alive” by the Bee Gees is approximately 103 beats per minute and is the AHA’s suggested memory aid for compression rate. If providing rescue breaths: 30 compressions followed by 2 breaths. If performing hands-only CPR: continuous compressions without interruption.
Rescue Breaths (if trained and willing)
After 30 compressions, tilt the head back gently and lift the chin. Pinch the nose closed with your thumb and index finger, make a complete seal over the victim’s mouth, and give a breath over 1 second, just enough to see the chest rise. If the chest does not rise, reposition the head and try again. Give the second breath and immediately resume compressions.
Expected Outcome
Compressions at correct rate and depth, chest visibly rising with each breath, no prolonged interruptions in compression cycles.
Warning
Do not check for a pulse repeatedly during CPR. Pulse checks interrupt compressions and are difficult to perform accurately under stress. Continue CPR until the AED is attached and analysing, EMS personnel take over, or the person shows obvious signs of recovery such as normal breathing or movement.
3
Child CPR (Ages 1 Through 7)
Child CPR follows the same general sequence as adult CPR but with two important differences in technique. Children’s chests and ribs are smaller and more pliable, and their hearts respond differently to the depth and force of compressions.
Key Differences from Adult CPR
Use one hand (or two if the child is larger) instead of two hands for compressions. Compress the chest by about 2 inches (5 centimetres), roughly one third of the chest depth. Rate remains 100 to 120 compressions per minute. Ratio remains 30 compressions to 2 rescue breaths if alone; if two rescuers are present, use 15 compressions to 2 rescue breaths.
Rescue Breaths for Children
Give gentle breaths, just enough to see the chest rise. Children’s lungs are smaller and require less volume than adults. An adult-sized breath forced into a child’s airway can cause stomach inflation, which can push the diaphragm upward and impair compressions. Use a slow, gentle breath over 1 second and watch for visible chest rise.
4
Infant CPR (Under 12 Months)
Infant CPR technique is significantly different from adult or child technique. The combination of an infant’s anatomy, the location of the heart in the chest, and the fragility of the ribs requires specific modifications that are not intuitive for someone trained only in adult CPR.
Compression Position
Place two fingers (index and middle) on the centre of the chest, just below the nipple line. The two-finger technique is for a single rescuer. If two trained rescuers are present, the two-thumb encircling technique is preferred: both thumbs side by side on the breastbone with hands encircling the infant’s chest.
Depth and Rate
Compress approximately 1.5 inches (4 centimetres), about one third of the chest depth. Rate remains 100 to 120 compressions per minute. Ratio is 30 compressions to 2 rescue breaths for a single rescuer; 15 to 2 if two trained rescuers are present.
Rescue Breaths
Cover both the infant’s mouth and nose with your mouth. Give a puff of air just enough to make the chest rise visibly. Infants require very little volume. Tilt the head very slightly back to open the airway. Do not hyperextend the neck as this can close the airway in an infant.
5
Use an AED as Soon as One Is Available
Turn It On and Follow Instructions
Modern AEDs provide clear audio and visual instructions when turned on. You do not need to know the device in advance to use it correctly. Turn it on, follow the instructions, and place the pads exactly as shown on the pad diagram. Most AEDs will say something like “Attach pads to bare chest” and then guide you through placement, rhythm analysis, and shock delivery.
Pad Placement for Adults
One pad on the upper right chest below the collarbone. One pad on the lower left side of the chest below and to the left of the heart. Make sure the skin is dry. If the person has a visible pacemaker or implanted defibrillator, place the pad at least 1 inch away from the device.
During Analysis and Shock
When the AED says “Analysing rhythm, do not touch the patient,” stop compressions and ensure no one is touching the person. If the AED advises a shock: stand clear, make sure no one is touching the person, and press the shock button when instructed. Immediately after the shock, resume CPR starting with chest compressions. Do not wait to see if the shock worked before resuming.
For Children Under 8
Use paediatric pads if available. If only adult pads are available, one pad may be placed on the front of the chest and one on the back to prevent the pads from touching each other. An AED with only adult pads is still preferable to no AED in a child in cardiac arrest.
Tip
CPR and AED use together significantly outperform either alone. Studies cited in the AHA’s 2020 guidelines found survival rates for witnessed cardiac arrest that received CPR and AED use before EMS arrival were substantially higher than those receiving CPR alone. The key is minimising the time between recognition of arrest and first shock. Every minute without defibrillation in ventricular fibrillation reduces survival probability by roughly 10 percent.
Best Practices
Rotate compressors every 2 minutes if others are available
High-quality CPR requires significant physical effort. After approximately 2 minutes, compression quality deglines even when the rescuer does not feel tired. If other bystanders are available, switch compressors every 2 minutes to maintain compression quality. Switch quickly during the brief AED rhythm analysis pause to minimise interruption time.
Minimise interruptions in compressions
Every pause in chest compressions allows blood pressure to drop and reduces perfusion to the brain and heart. Limit all interruptions, including rhythm checks, compressor switches, and rescue breath delivery, to less than 10 seconds. The AHA’s 2020 guidelines emphasise that chest compression fraction, the proportion of time during CPR that compressions are occurring, should exceed 60 percent and ideally approach 80 percent.
Allow full chest recoil between compressions
Leaning on the chest between compressions prevents full recoil, which reduces cardiac filling and decreases the effectiveness of each subsequent compression. Release pressure completely between compressions while keeping your hands in contact with the chest. This is more difficult to maintain as fatigue sets in, which is another reason to rotate compressors.
Common Mistakes
Common Mistake
What to Do Instead
Compressions too shallow
Push down at least 2 inches for adults. Many untrained bystanders compress to only 1 to 1.5 inches. If the effort feels insufficient to fatigue your arms within 2 minutes, you are probably not compressing deeply enough.
Compressing too fast or too slow
Target 100 to 120 per minute. Faster than 120 reduces compression depth; slower than 100 reduces blood flow. If you do not have a mental reference, count “one-and-two-and-three-and…” at a pace where each number takes about half a second.
Stopping to check for pulse frequently
Pulse checks interrupt compressions and are unreliable under stress. Trust the AED. Continue CPR until the AED is attached, the dispatcher tells you to stop, or EMS takes over.
Rescue breaths given too hard or too fast
Each breath should take 1 second and produce visible chest rise. Excessive volume or force pushes air into the stomach, causing inflation that impairs compression effectiveness and increases regurgitation risk.
Waiting for AED before starting compressions
Begin CPR immediately. The AED should be applied without stopping compressions. One person compresses while another prepares the AED pads. Do not pause compressions until the AED is ready to analyse.
Compliance Notes: Legal Protections and Workplace Requirements
Good Samaritan Laws: What They Protect and Where They Apply
All 50 US states have Good Samaritan laws that provide civil immunity to bystanders who provide emergency assistance in good faith. The specific scope and conditions vary by state, but the general protection covers lay rescuers who respond to emergencies voluntarily, without expectation of payment, and without gross negligence or willful misconduct.
Most states extend this protection to AED use specifically. Many state laws were updated after the Cardiac Arrest Survival Act of 2000 to explicitly include AED users and trained bystanders in the immunity provision. Some states require that the AED user have completed a training course for immunity to apply; others extend protection regardless of training status.
The protection does not apply when the rescuer causes harm through gross negligence, when the rescuer is compensated for providing assistance, or in some states when the victim objects to receiving CPR. In practice, successful civil lawsuits against good-faith CPR responders are extremely rare. The legal risk of attempting CPR is substantially lower than the moral and practical risk of not acting.
OSHA Workplace Requirements
OSHA’s standard at 29 CFR 1910.151 requires that employers with workplaces where serious injuries could occur in the absence of an infirmary, clinic, or hospital in near proximity must ensure the availability of a person trained in first aid. Near proximity is generally interpreted as within 3 to 4 minutes of emergency response.
For higher-hazard workplaces including construction, manufacturing, and oil and gas operations, OSHA expects adequate first aid training for workers. This typically includes CPR training. OSHA’s general industry guidelines recommend that workplaces consider AED programs, particularly in settings where cardiac risk is elevated or where EMS response times exceed 4 to 5 minutes.
Some states have enacted additional requirements. California requires certain employers to have trained first aid responders available at all times during work shifts. Check your state OSHA plan for requirements that may exceed the federal standard.
Troubleshooting
The chest is not rising during rescue breaths
The most common cause is an incomplete seal around the mouth, or a neck position that is not opening the airway adequately. Retilt the head, reposition the chin lift, recheck the seal, and try again. If after two attempts the chest still does not rise, continue with compressions only. Do not interrupt compressions repeatedly to attempt rescue breaths that are not working.
The AED says “No shock advised”
Continue CPR immediately. “No shock advised” does not mean the person is recovering or that CPR is no longer needed. It means the AED has detected a rhythm that defibrillation cannot correct, such as asystole (no electrical activity). In these cases, CPR is the only intervention available until EMS arrives. The AED will continue to monitor and will advise a shock if the rhythm changes.
The person vomits during CPR
Turn the person onto their side to clear the airway, wipe out the mouth as quickly as possible, and return to compressions. Vomiting during CPR is common. It is caused by the pressure of compressions on the stomach and by air entering the stomach during rescue breaths. Do not stop CPR for more than a few seconds to manage this.
Quick Checklist
Recognition and Activation
Scene confirmed safe before approaching
Victim tapped and shouted at; no response
No normal breathing confirmed
911 called or directed to specific person
AED retrieval directed to specific person
CPR Technique
Correct hand position on lower breastbone
Compression depth at least 2 inches (adult)
Rate 100 to 120 per minute
Full chest recoil between compressions
Minimal interruptions; compressors rotating every 2 minutes
AED Use
AED applied as soon as available without stopping compressions
Pads placed correctly on bare, dry skin
All clear called and confirmed before shock delivery
CPR resumed immediately after shock
CPR continued until EMS takes over or person recovers
Key Takeaways
Hands-only CPR is better than no CPR
The AHA’s 2010 guidelines update established that for adult cardiac arrest, hands-only CPR is as effective as conventional CPR with rescue breaths for the first few minutes. If you are unwilling or unable to perform rescue breaths, continuous compressions without rescue breaths still provide meaningful circulatory support and are strongly preferred over doing nothing while waiting for EMS.
Good Samaritan laws provide real protection
Fear of legal liability is one of the most commonly cited reasons that bystanders hesitate to perform CPR. In practice, civil lawsuits against good-faith bystander CPR responders are vanishingly rare. All 50 states have laws providing civil immunity for good-faith emergency assistance. The legal risk of acting is substantially lower than most bystanders believe, and incomparably lower than the consequence of not acting when someone is in cardiac arrest.
Quality matters as much as speed
Starting CPR quickly matters. So does performing it correctly. Shallow compressions, excessive interruptions, and inadequate depth all reduce the circulatory benefit significantly. The AHA’s emphasis on “high-quality CPR” in its 2020 guidelines reflects research showing that compression quality, not just compression rate, is a key determinant of survival outcomes. This is why formal certification courses with hands-on practice on mannequins produce better outcomes than educational material alone.
Frequently Asked Questions
Can I be sued for performing CPR on someone?
In all 50 US states, Good Samaritan laws provide civil immunity for good-faith emergency assistance. Successful lawsuits against bystander CPR responders are extremely rare. Protection does not cover gross negligence, but imperfect good-faith CPR attempts are covered.
What is the difference between hands-only CPR and conventional CPR?
Hands-only CPR consists of chest compressions only, without rescue breaths. Conventional CPR combines chest compressions with rescue breaths at a ratio of 30 compressions to 2 breaths. The AHA recommends hands-only CPR for adult bystanders who witness a sudden cardiac arrest and are not trained in CPR or not comfortable providing rescue breaths. For child and infant cardiac arrest, rescue breaths are more important because pediatric cardiac arrest more often results from respiratory failure rather than a primary cardiac event. Trained rescuers should use the full 30:2 ratio for all ages.
How do I know if CPR is working?
During CPR, you cannot reliably tell whether your compressions are maintaining circulation. You may see the chest rise during rescue breaths, which confirms airway patency. Signs that spontaneous circulation has returned include normal breathing, movement, or the person regaining consciousness. The AED will also analyse rhythm and may advise a shock if a shockable rhythm is present. Do not stop CPR to check for these signs; continue until the AED instructs you to pause for analysis, EMS takes over, or you observe obvious signs of recovery.
Does my employer have to have someone trained in CPR on site?
Under OSHA 29 CFR 1910.151, employers whose workplaces are not in near proximity (generally 3 to 4 minutes) to a hospital or emergency clinic must ensure a trained first aid person is available. For manufacturing, construction, warehousing, and remote operations, this typically means at least one trained first aid and CPR responder on site during every work shift. The regulation does not prescribe CPR certification by name, but OSHA’s interpretation letters and compliance guidance consistently treat CPR as an expected component of workplace first aid training, particularly where defibrillation response times from EMS exceed 4 to 5 minutes. State OSHA plans in California and several other states impose additional specific requirements beyond the federal standard.
Government and Regulatory Sources
Related VelSafe Articles
Get Certified
Reading a CPR guide builds knowledge. Practising on a mannequin under instruction builds skill. The AHA and American Red Cross both offer in-person and blended CPR and first aid certification courses that typically take two to four hours and provide hands-on practice with feedback. Workplace CPR certifications are generally valid for two years. OSHA recommends refresher training in line with the certification validity period. Find more workplace emergency preparedness resources at velsafe.com.